How to change Bags and Filters in a Miele vacuum? | Miele dealer Acevacuums
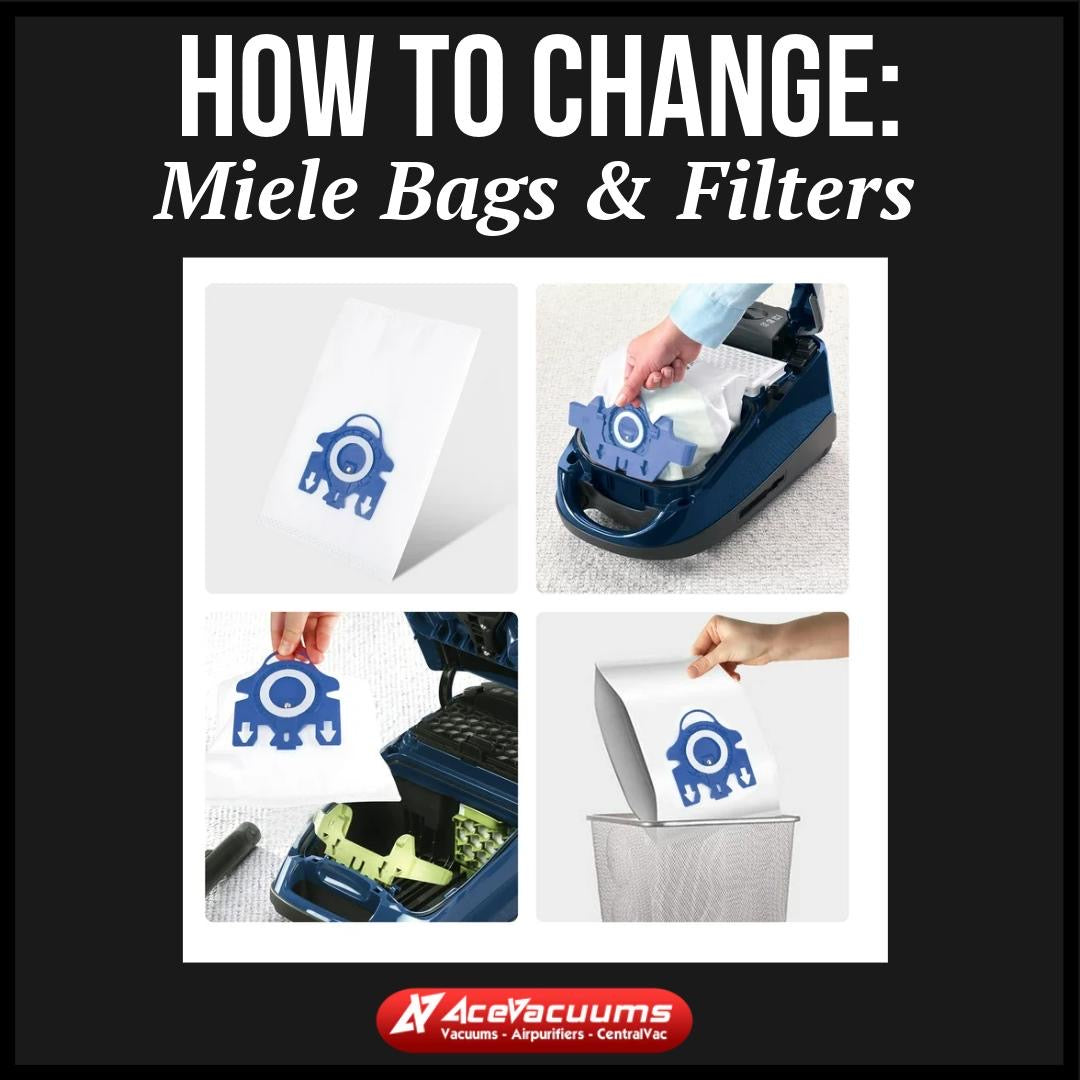
We are going to show how to change Miele GN, FJM bags | Active AirClean Filters in a Miele vacuum cleaner.
First How to Change the Bag in a Miele Vacuum Cleaner
Changing the bag in a Miele vacuum cleaner is a simple but essential task to maintain optimal performance and hygiene. Miele vacuums use high-quality AirClean 3D Efficiency dust bags, which are designed to trap fine dust and allergens effectively. Follow these detailed steps to change the bag safely and efficiently:
1. Know When to Change the Bag
-
Indicators:
- Most Miele vacuums have a bag change indicator on the body of the machine. When the indicator turns red, the bag is full and needs to be replaced.
- If you notice reduced suction or unusual noise during operation, this might also indicate that the bag is full or clogged.
- Visual Check: If you're unsure, open the vacuum to inspect the bag. If it appears full or overstuffed, replace it.
2. Prepare for the bag Change
-
What You Need:
- A new Miele dust bag compatible with your vacuum model. Common types include GN, FJM, or U bags, depending on your model. Check your user manual or the vacuum body for the correct type.
- Ensure the vacuum is turned off and unplugged for safety.
- Clean Hands: Wash your hands or wear gloves if you're sensitive to dust or allergens.
3. Open the Vacuum Cleaner Compartment
- Locate the dust compartment release button:
- On Miele canister models, the release button is usually at the front or top of the vacuum. Press it to open the lid.
- The lid will lift up to reveal the dust miele bag compartment.
4. Remove the Old Dust Bag
-
Secure Removal: The Miele bags are designed with a built-in hygienic self-closing flap:
- Gently pull the miele bag away from the holder.
- The flap will automatically seal, preventing dust and debris from escaping.
- Dispose of the miele bag in your household trash. Place it in a sealed plastic bag if you’re concerned about allergens.
5. Insert the New Dust Bag
- Take a new miele bag and check that it matches your vacuum’s model type (e.g., GN, FJM, or U).
- Align the miele bag collar with the bag holder inside the compartment:
- Slide the collar into the guide rails or clips until it clicks into place.
- Ensure the miele bag is securely seated and not bent or folded, as this can block airflow.
6. Inspect and Replace miele Filters (if Necessary)
-
Miele vacuums often include miele filters (motor protection filter and exhaust filter) that may need periodic replacement. Changing these at the same time as the bag is a good habit:
- Check the motor protection miele filter behind the miele bag. If it appears dirty, replace it with a new one (usually included with Miele bags).
- Inspect the AirClean or HEPA filter at the exhaust. Follow the replacement schedule recommended in your user manual.
7. Close the Vacuum Compartment
- Gently lower the compartment lid and press it down until it clicks shut.
- Ensure there are no gaps or misalignments, as this could affect suction or cause the vacuum to leak dust.
8. Test the Vacuum
- Plug the vacuum back in and turn it on.
- Check for normal suction and operation to confirm that the miele bag has been installed correctly.
Tips for Optimal Performance
- Always use genuine Miele bags and miele filters to ensure proper fit, suction, and filtration. Generic or counterfeit miele bags may not seal correctly, leading to loss of suction or dust leakage.
- Change the dust miele bag before it becomes completely overfilled to prevent strain on the motor and maintain maximum suction.
- Store spare dust miele bags in a clean, dry place to avoid contamination.
By following these steps, you’ll keep your Miele vacuum cleaner operating efficiently and extend its lifespan while maintaining a clean, allergen-free environment in your home.
How to Change the Miele Active AirClean Filter
The Miele Active AirClean filter is a high-performance filtration system designed to trap fine dust, allergens, and odors, making it ideal for homes with pets or people sensitive to allergens. It requires periodic replacement to ensure optimal performance. Follow this detailed guide to replace the filter correctly:
1. Know When to Change the Active AirClean Filter
-
Replacement Frequency:
- Miele recommends replacing the Active AirClean miele filter approximately every 50 hours of vacuuming or once a year, depending on usage.
-
Check the Timestrip Indicator:
- Some miele filters come with a Timestrip® replacement indicator that activates when the miele filter is installed. If the red bar on the Timestrip reaches the end, it’s time to replace the miele filter.
2. Prepare for the miele filter Replacement
-
What You Need:
- A new Miele Active AirClean filter compatible with your vacuum model. Verify the miele filter type (e.g., SF-AA50 or similar) in your vacuum’s user manual or on the original miele filter.
-
Turn Off and Unplug the Vacuum:
- For safety, ensure the vacuum cleaner is powered off and unplugged.
3. Access the miele Filter Compartment
-
Locate the miele Filter Compartment:
- Open the dust compartment of your vacuum cleaner. On most Miele canister vacuums, this is the same compartment where the dust bag is housed.
-
Remove the Old Filter:
- Find the miele filter slot, typically located next to or behind the dust bag.
- Gently pull out the old Active AirClean filter by its edges.
4. Install the New miele Active AirClean Filter
-
Prepare the New Filter:
- Remove the new miele filter from its packaging. If it has a Timestrip indicator, activate it by pressing firmly on the red dot until it clicks. This will start the timer.
-
Insert the Filter:
- Slide the new miele filter into the designated slot in the vacuum’s filter compartment. Ensure it fits snugly and is aligned properly.
- Make sure the miele filter is seated flat and does not block any airflow pathways.
5. Close the Dust Compartment
- Once the miele filter is securely in place, close the dust compartment lid.
- Ensure it clicks shut to maintain the vacuum's airtight seal.
6. Test the Vacuum
- Plug the vacuum back in and power it on to confirm proper operation.
- Check for normal airflow and suction. If you notice any unusual noises or reduced performance, recheck the miele filter installation.
Additional Tips for Customers
-
Use Genuine Miele Filters:
- Genuine miele filters are designed specifically for Miele vacuums and provide the best fit, performance, and filtration. Counterfeit filters may compromise air quality and vacuum efficiency.
-
Dispose of the Old Filter Safely:
- Place the used miele filter in a sealed bag to prevent dust or allergens from escaping before disposing of it in the trash.
-
Maintain Your Vacuum:
- Alongside miele filter replacement, clean or replace the motor protection miele filter (located behind the dust bag) if it appears dirty. Miele often includes a replacement with the dust bags.
-
Consider HEPA Upgrade:
- If you need a higher level of filtration, Miele offers HEPA AirClean filters as an upgrade, which trap even finer particles and are ideal for allergy sufferers.
Why Replacing the Active AirClean Filter is Important
- Improves Air Quality: Ensures that fine dust, pet dander, and odors are effectively filtered out, maintaining a clean and healthy home environment.
- Prevents Odor Build-Up: The miele filter activated charcoal layer neutralizes unpleasant odors, especially useful in homes with pets.
- Protects Vacuum Performance: A clean miele filter allows for proper airflow, which helps maintain suction power and prolongs the vacuum’s lifespan.
By following these steps, customers can ensure their Miele vacuum continues to deliver top-notch performance while keeping their home clean and odor-free.
At Acevacuums, we do vacuum cleaner repair, vacuum cleaner service, commercial vacuum repair, central vacuum repair, central vacuum service, central vacuum installation, robotic vacuum repair and appliance repairs.
We are an authorized vacuum cleaner dealer & vacuum repair and warranty center for dyson vacuum, miele vacuum, Oreck vacuum, riccar vacuum, kirby vacuum, bissell vacuum, hoover vacuum, shark vacuum, Electrolux vacuum, kenmore vacuum and more... We give free vacuum repair estimates for all vacuum cleaners before we repair them. We also do sameday vacuum repair service depending on the vacuum parts availability. We use genuine vacuum parts for all vacuum repairs. All our vacuum repair comes with 30 days guarantee
- 20 Nov, 2024


