Vacuum & Central Vac Repair | Sameday
Leesburg Store
300 Fort Evans Rd, NE, Leesburg, VA 20176.Call 703 997 9292 X 2 ; Open 7 days,
Get Real-Time Traffic & Directions: Leesburg
Fairfax Store
11110 Main St, Fairfax, VA 22030 .Call 703 997 9292 X 1 ; Open 7 days,
Get Real-Time Traffic & Directions: Fairfax

Sewing Machine Maintenance Tips:
Huge numbers of sewing machines have been manufactured over the years. The older vintage sewing machines are virtually indestructible, indeed one highly skilled and experienced seamstress told me that she still uses a 1929 treadle machine as her daily workhorse. Newer sewing machines, especially the very cheap ones, have many more plastic parts and a much shorter life. Nevertheless, the life and effectiveness of any machine can be extended with simple maintenance, and my aim here is to show you how.
For demonstration purposes in this Instructable I will use a vintage machine probably dating from the 1950's or 60's because it's easier to show the mechanism, however, all sewing machines work in the same way. If you can get hold of such a machine, so long as it's complete, you should be able to keep it running indefinitely and certainly much longer than a modern sewing machine.
Common problems and solutions
Breaking needles
First of all, ensure you've threaded the machine correctly. It may be that you are using the wrong type of needle. For normal use on light fabrics, a size 10 or thereabouts should work well, but on heavier cloth such as denim or canvas a needle size up to 16 will be required. For leather or vinyl you will need a wedge-point needle.
Machine seized up
After many years of disuse a machine may completely seize up. Lubricate thoroughly as described under Maintenance. You may have to leave the oil for a while in order to ease the parts and repeat several times, wiping away any excess.
Snagging or breaking thread
First of all, if you have disassembled anything, make sure you have reassembled it correctly and that you can turn the hand wheel freely. Ensure the needle isn't bent and that it feels smooth as you run it between your fingers from the shank to the tip. A new needle is recommended after 6 - 8 hours of sewing.
Make sure the machine is threaded correctly with good quality thread - an incorrectly threaded machine will never work. If you don't have a printed instruction booklet, look on the Internet for instructions for the same or a similar model. On some machines you thread the needle from left to right, and from right to left on others. It's important to get it right.
Check that the needle is fitted correctly. The flat on the shank of the needle lies against a flat on the needle holder with the needle pushed up as high as it will go. Tighten the screw but only as much as you can with your fingers.
Ensure the bobbin is the correct type for the machine and is threaded and fitted correctly. There are several types of bobbin, subtly different. The bobbin case holder has a sharp point which hooks the top thread in order to pass it around the bobbin. Problems can result if this has been roughened by needle strikes. Smooth it with fine emery as described under Maintenance.
Before starting to sew, make sure there isn't excessive slack in the top thread. If you have just fitted the bobbin, place your finger on the loose end of the top thread and turn the hand wheel as if to make one stitch. When you now pull the top thread it should draw up the bottom thread. Place your finger on the loose ends of both threads as you make the first stitch or two otherwise they may snag.
Poor speed control
If nothing happens when you press the foot pedal a little, but the machine races when you press it just a little more then it will be very hard to sew successfully. The foot pedal may simply need lubricating. On older machines this will contain a rheostat, which is a variable resistance wired in series with the motor. Newer sewing machines will more likely have an electronic speed control similar to a dimmer switch.
First, double check that it's not still plugged in. You will need to examine it to determine how to disassemble it. Do not use sewing machine oil, but rather any light lubricating oil, or grease on sliding parts, and keep oil and grease away from all electrical contacts.
Also, check the belt tension. Check out the page on Electric motors if the motor may be faulty. Replacing the brushes or cleaning the commutator might be necessary. The motor bearings can be lubricated with light lubricating oil.
Maintenance
Cleaning
The first thing to do (before disassembly) is to remove all dust and fluff. Between the feed dogs is a favourite place for it to collect. Remove the needle plate (through which the feed dogs protrude) to facilitate cleaning. Where it has become matted you can pick it out with a pin or a needle, otherwise use a brush and/or a vacuum cleaner crevice tool. You can use a can of compressed air but be careful you don't simply blow the fluff further into the mechanism. Look out for any pieces of broken needle which have come to rest here and might jam the mechanism.
Check for and remove any dust, fluff or pieces of broken thread where the thread passes between the discs of the upper tension adjuster.
Oiling

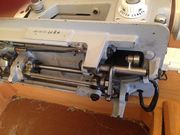
A well used machine may need lubrication and cleaning several times a year. Once a year is beneficial even for light or occasional use. Older machines allow easy access to the mechanism. Newer machines tend to be completely enclosed in plastic. There may be screws holding the case together but even after removing these it may be tricky to open. If the case is in two halves, probe the crack between them. You will probably find a series of clips that can be released with a thin spatula or knife, or a prying tool, or it may become evident that there remain one or more screws to remove.
Next, oil anything that moves. Remember, use nothing but sewing machine oil. There will be various levers, cams, cogs and bearings both in the top of the machine driving the needle, and under the base driving the bobbin and feed dogs. Apply no more than a drop of oil, wipe away any excess, and avoid getting it anywhere where it could contaminate the next sewing job.
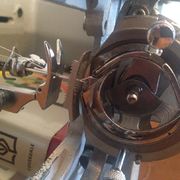
Bobbin and bobbin case and needle
Remove the bobbin and bobbin case, and any dust or fluff on them. The bobbin case fits into a bobbin case holder which rotates as the machine operates. It should be easily removed, for example by releasing a pair of clips on a retaining ring. It has a sharp point which hooks the upper thread so as to engage it with the lower thread. Run your finger over this and if it feels rough (probably due to needle strikes) then smooth off any burrs with fine emery. Take care to reassemble it correctly.

|

|

|

|

|
Note that some older (especially pre-war) machines have a quite different design of bobbin. This fits in a bullet-shaped shuttle which is thrown through a loop in the upper thread to make each stitch. Modern machines either have front loading bobbins similar to the photos though often accessed from the front of the machine, or top loading bobbins where a similar mechanism is mounted horizontally.
Check for any roughness on the needle, possibly caused by it striking something. It can be smoothed with fine emery but is probably better replaced and should be replaced as a matter of course after 6 - 8 hours of sewing.
Bobbin tension


It's important to check the bobbin tension as you will get poor results and possibly broken or snagging thread if it's wrong. Fit a bobbin of thread to the bobbin case and thread it under the tension spring. Suspend it by the thread. The tension is correct if the tension is just sufficient to support the weight of the bobbin and case. Adjust the tension by adjusting the screw in the tension spring.
Bobbin winder
Examine the bobbin winder. This often engages with the hand wheel by means of a wheel with a rubber tyre. If the tyre is worn or cracked or perished, replace it. Spares are generally easy to obtain.
Electrics
Check that the foot pedal allows smooth control of the speed, and lubricate (after disconnecting from the mains) if necessary.
If the machine is fitted with a lamp to illuminate the work, check the bulb. A replacement is easily fitted on older machines, but it may be harder on newer ones where the works are totally enclosed in plastic. Consider replacing a filament bulb with a more modern LED equivalent which will run much cooler. Take the old one with you to make sure you get a new one with the same sort of base. Some are Edison Screw (ES) whereas others are Bayonet Cap (BC) and there are two common sizes of each.
Timing
If you are getting unexplained broken threads, it could be that the timing needs adjustment. This is beyond what can be covered at this level and may be best left to a professional with the appropriate service manual, but it's not too difficult to see whether this is indeed the problem.
You need to be able to see the needle and the hook at the point where the hook catches the top thread. In the photo, the machine is turned on its side to show the underneath, and the bobbin and and the plate which holds the bobbin carrier in place have been removed.
With the needle threaded, turn the handwheel until the hook passes the needle, whilst holding the free end of the thread taught, but without pulling on it.
The tip of the hook should pass the needle just after it has reached its lowest point. Typically, the needle should have risen 3/16 of an inch (1/10 of an inch, or 2.5mm). At this point, the rising needle causes the thread to go slack and form a loop which is caught by the hook. The photo shows the thread having been securely caught after the handwheel has been turned a little further.
Turning the handwheel still further, you should see the thread drawn around the bobbin (if you have it in place) so as to make a stitch.
If the alternative is to scrap the machine, by all means search online for your make and model of sewing machine with the key words "timing adjustment" appended, and you should at least be able to see what is involved in adjusting the timing. You need to ensure both that the lowest point of the needle brings the eye to the right level beneath the hook, and also that the hook passes the needle after it has risen by the prescribed amount. These settings and how to adjust them should be given in the machine's service manual, if you can get hold of it.
The DMV’s Trusted Vacuum Service Authority
For 25+ years, Ace Vacuums has filled the gap left by big-box retailers. We provide the expert repairs, warranty support, and genuine OEM parts that Amazon and Walmart simply don't offer. From free estimates to same-day service, we are your local alternative for professional home care solutions.
Expert Repairs
- • Vacuum Belt & Roller Repair
- • Motor Service & Replacement
- • Suction Loss & Clog Removal
- • HEPA Filter & Bag Replacement
- • Central Vacuum Installation
- • Central Vacuum Repair
- • Free Repair Estimates
Authorized Center
- • Miele & SEBO Warranty
- • Dyson & Riccar Specialists
- • Shark, Bissell & Hoover
- • Kirby & Oreck Rebuilds
- • MD & Beam Central Vac
- • Austin Air & Blueair
- • Simplicity & Electrolux
Northern Virginia
Regional Reach
Conveniently serving Washington D.C. and Maryland (Montgomery & Prince George's Counties). Our showrooms are just 20 minutes from DC and 10 minutes from Tysons Corner.
Hablamos Español — Service in English & Spanish.
Serving Zip Codes: 20147, 20176, 22030, 22031, 20151, 20190, 22102, 22314, 20110, 20148 & surrounding areas. All repairs performed by certified technicians using genuine parts.